#100DaysOfCloudDevOps Challenge — Day 02 — Docker Basics: Configuring Vagrant to use Docker as the provider for a container-based local environment

Welcome to Day 02 of my #100DaysOfCloudDevOps challenge!
In this article, I'll show how I setup up a container-based local environment with Docker using Vagrant.
My goal and why did I decide to use this?
The next days tasks is more exploring and playing with linux commands using terminal. I want a separate environment than my own personal computer and this container-based local environment provides a controlled and isolated space for this testing or educational purpose, where I can experiment without affecting any of my personal computer systems, so it's a safe place to try out new things without messing up anything important.
First, what is a local environment?
A "local environment" refers to the computing environment or setup that is installed and running on a personal computer or local workstation. It typically includes all the necessary software, tools, and configurations required for development, testing, or other purposes.
Imagine you're an artist, and you have a cozy corner in your home where you paint your masterpieces. This corner is your "local environment" for creating art. You've set it up with all your favorite paints, brushes, and canvases.
In this setup:
Your cozy corner is like your computer.
Your paints, brushes, and canvases are like the software, files, and tools you need for your projects.
Choosing to work in your cozy corner (your local environment) is like choosing to work on your computer rather than somewhere else, like a studio or gallery.
Then, what is a container-based local environment?
A container-based local environment refers to a setup on your personal computer where software applications and services are run within isolated containers. So instead of installing software directly onto your computer, we use containers or another box to run them.
This container-based local environment is like a little virtual computer that runs just the software you need that is not directly installed onto the personal computer itself.
What is Docker?
The official definition of Docker is:
"Docker is an open platform for developing, shipping, and running applications. Docker enables you to separate your applications from your infrastructure so you can deliver software quickly. With Docker, you can manage your infrastructure in the same ways you manage your applications. By taking advantage of Docker’s methodologies for shipping, testing, and deploying code quickly, you can significantly reduce the delay between writing code and running it in production."
I will dive deeper in this topic in another upcoming blog.
However, in this task I used Docker to build a container in my machine or personal computer, based on the Ubuntu operating system with an SSH server and as the provider for Vagrant.
What is Vagrant?
The official definition of Vagrant is:
"Vagrant is an open-source tool for building and managing virtualized development environments. It provides a simple and consistent way to create and configure lightweight, reproducible virtual machines (VMs) or containers for various development tasks. Vagrant abstracts away the complexity of managing VMs and allows developers to define their environments as code, making it easier to share and collaborate on projects across different platforms and team members."
I will dive deeper in this topic in another upcoming blog.
However, in this task I used Vagrant configuration to use the Docker image and to abstracts away the complexities of managing Docker containers directly that is an Ubuntu image.
Why use Vagrant with Docker?
Since I'm using an Apple M2 chip, which is based on ARM architecture, I won't be able to run VirtualBox, VMware, and Hyper-V as it doesn't support ARM architecture. I can achieve my goal using Docker and Vagrant to set up a container-based local environment on my Mac.
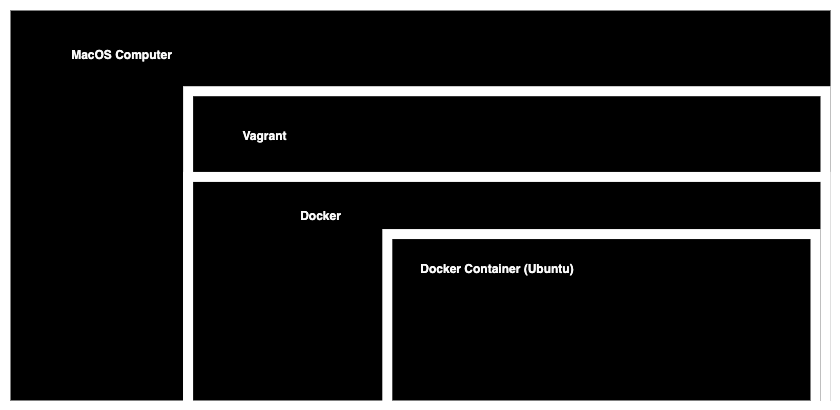
Architecture Design
Here's a step-by-step guide to configuring Vagrant to use Docker as the provider for a container-based local environment:
Install Homebrew (if not already installed):
Homebrew is a package manager for macOS. Open Terminal and paste the following command to install Homebrew:
/bin/bash -c "$(curl -fsSL https://raw.githubusercontent.com/Homebrew/install/HEAD/install.sh)"
Install Docker Desktop:
- Docker Desktop for Mac M2 chip architecture. You can download it from the Docker website: Docker Desktop for Mac.
Install Vagrant:
Vagrant provides a simple and easy-to-use command-line interface for managing virtual machines. Install it via Homebrew:
brew install vagrant
Set up a Dockerfile:
First, you need to make a folder or directory where you'll keep all the settings for your setup. Then, go into that directory.
  cd 100DaysOfCloudDevOps/cloud-devops
  mkdir day02
  cd day02
Create a Dockerfile:
touch DockerfileAnd add the following content:
  FROM ubuntu

  ENV TZ=America/Mexico_City
  RUN ln -snf /usr/share/zoneinfo/$TZ /etc/localtime && echo $TZ > /etc/timezone

  RUN apt-get update -y

  RUN apt-get install -y --no-install-recommends ssh sudo

  RUN useradd --create-home -s /bin/bash vagrant
  RUN echo -n 'vagrant:vagrant' | chpasswd
  RUN echo 'vagrant ALL = NOPASSWD: ALL' > /etc/sudoers.d/vagrant
  RUN chmod 440 /etc/sudoers.d/vagrant
  RUN mkdir -p /home/vagrant/.ssh
  RUN chmod 700 /home/vagrant/.ssh
  RUN echo "ssh-rsa AAAAB3NzaC1yc2EAAAABIwAAAQEA6NF8iallvQVp22WDkTkyrtvp9eWW6A8YVr+kz4TjGYe7gHzIw+niNltGEFHzD8+v1I2YJ6oXevct1YeS0o9HZyN1Q9qgCgzUFtdOKLv6IedplqoPkcmF0aYet2PkEDo3MlTBckFXPITAMzF8dJSIFo9D8HfdOV0IAdx4O7PtixWKn5y2hMNG0zQPyUecp4pzC6kivAIhyfHilFR61RGL+GPXQ2MWZWFYbAGjyiYJnAmCP3NOTd0jMZEnDkbUvxhMmBYSdETk1rRgm+R4LOzFUGaHqHDLKLX+FIPKcF96hrucXzcWyLbIbEgE98OHlnVYCzRdK8jlqm8tehUc9c9WhQ==" > /home/vagrant/.ssh/authorized_keys
  RUN chmod 600 /home/vagrant/.ssh/authorized_keys
  RUN chown -R vagrant:vagrant /home/vagrant/.ssh
  RUN sed -i -e 's/Defaults.*requiretty/#&/' /etc/sudoers
  RUN sed -i -e 's/\(UsePAM \)yes/\1 no/' /etc/ssh/sshd_config

  RUN mkdir /var/run/sshd

  RUN apt-get -y install openssh-client

  EXPOSE 22
  CMD ["/usr/sbin/sshd", "-D"]
Dockerfile Code explanation:
I'll use the official Ubuntu image for Docker, like it's mentioned with "FROM ubuntu".
When you're updating with "apt-get update -y" or "apt update -y", it might ask you to set the timezone. It will wait for your choice.
To skip this, you need to put some settings in the Dockerfile. Here's how: just add these lines.
  ENV TZ=America/Mexico_City
  RUN ln -snf /usr/share/zoneinfo/$TZ /etc/localtime && echo $TZ > /etc/timezone
Changing the time zone to match where you live.
To use Vagrant, you need to connect through SSH to get into the container. Docker images only have a root user by default. You need to set up another user who also has root powers. That's why we need to install the ssh and sudo packages.
In the next steps, we make a new user called "vagrant" and give them a password. This user won't need to type in their password when doing things that need root powers. We also add this user to the sudo group.
  RUN useradd --create-home -s /bin/bash vagrant
  RUN echo -n 'vagrant:vagrant' | chpasswd
  RUN echo 'vagrant ALL = NOPASSWD: ALL' > /etc/sudoers.d/vagrant
Below is making a folder or directory called ".ssh". This directory holds all the files for setting up connections with SSH.
  RUN mkdir -p /home/vagrant/.ssh
  RUN chmod 700 /home/vagrant/.ssh
A not-so-safe key is put in at the start. But don't worry, we'll switch it out with a safer one when you set up your virtual space for the first time. And we'll make sure the .ssh folder belongs to the vagrant user.
You can sign in with the main user, but there's no password set. You can change the password adding a similar line but changing
vagrant:vagranttoroot:THEPASSWORDYOUCHOOSEor after log in.RUN echo "ssh-rsa AAAAB3NzaC1yc2EAAAABIwAAAQEA6NF8iallvQVp22WDkTkyrtvp9eWW6A8YVr+kz4TjGYe7gHzIw+niNltGEFHzD8+v1I2YJ6oXevct1YeS0o9HZyN1Q9qgCgzUFtdOKLv6IedplqoPkcmF0aYet2PkEDo3MlTBckFXPITAMzF8dJSIFo9D8HfdOV0IAdx4O7PtixWKn5y2hMNG0zQPyUecp4pzC6kivAIhyfHilFR61RGL+GPXQ2MWZWFYbAGjyiYJnAmCP3NOTd0jMZEnDkbUvxhMmBYSdETk1rRgm+R4LOzFUGaHqHDLKLX+FIPKcF96hrucXzcWyLbIbEgE98OHlnVYCzRdK8jlqm8tehUc9c9WhQ==" > /home/vagrant/.ssh/authorized_keys RUN chmod 600 /home/vagrant/.ssh/authorized_keys RUN chown -R vagrant:vagrant /home/vagrant/.ssh
Set up a Vagrantfile:
Now create a
Vagrantfile:touch VagrantfileAnd add the following content:
  Vagrant.configure("2") do |config|
    config.vm.provider :docker do |d|
       d.build_dir = "."
       d.remains_running = true
       d.has_ssh = true
    end
  end
Vagrantfile Code Explanation:
Here you're telling Vagrant to create the Docker image using the instructions in the Dockerfile. The container can be accessed using SSH and it should always be running.
  d.build_dir = "."
  d.remains_running = true
  d.has_ssh = true
To put software on your system, you can use a simple script or a tool that helps set up things, like Vagrant supports. You can also tell Docker how to install and set up the software you need.
If you want to use a bash script, just add the following line after
config.vm.provider.config.vm.provision :shell, path: "script.sh", privileged: falseThe
privilegedoption is set tofalseas you will not require to run these commands withrootpermissions.
Start the Virtual Machine:
Use the following command to start the VM:
vagrant upWhen you tell Vagrant to "vagrant up," it follows instructions to create a Docker image using the Dockerfile you provided and then starts a container based on that image. This makes Vagrant read the settings in the Vagrantfile, set up the Docker container according to the Dockerfile's plan, and finally, begin running the container.
Access the Virtual Machine:
Once the VM is up and running, you can access it or login via SSH using Vagrant:
vagrant ssh
Now that I've logged into my Ubuntu VM, I can practice Linux commands to my heart's content.
In this article I successfully set up a container-based local environment using Docker with Vagrant. Elaborate why I have to have a separate environment for exploring Linux commands without affecting my personal computer. Explain what a local environment and a container-based environment are, along with introducing Docker and Vagrant. Finally, I provide step-by-step instructions for installing necessary tools, creating Dockerfile, setting up Vagrantfile, starting the virtual machine, and accessing it via SSH.
Find the GitHub repo here.
If you find this blog helpful too, give back and show your support by clicking heart or like, share this article as a conversation starter and join my newsletter so that we can continue learning together and you won’t miss any future posts.
Thanks for reading until the end! If you have any questions or feedback, feel free to leave a comment.
